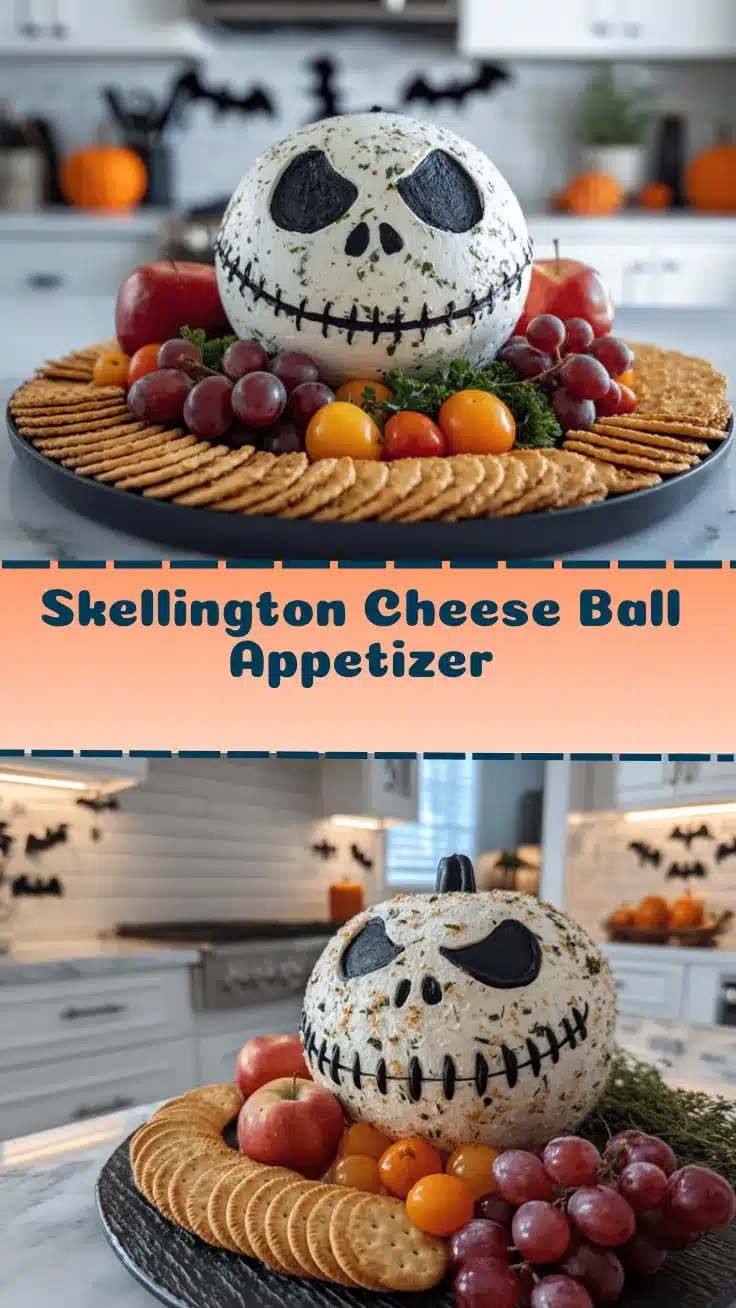
It’s wild how a party can go from ordinary to unforgettable with just one show-stopping snack. Picture this: a creamy, savory Skellington Cheese Ball grinning up from the appetizer table, stealing the spotlight—and maybe even a few gasps! Honestly, the first time I made this for a Halloween bash, I watched grown adults scramble to snap photos before anyone dared break into Jack’s cheesy smile. It’s fun, a little spooky, and totally delicious.
I stumbled onto the idea for a Skellington Cheese Ball when my daughter begged for something “creepy cute” for her classroom party. The classic cheese ball needed a serious Halloween twist, so Jack Skellington—the Pumpkin King himself—became my muse. Not only did it turn out super photogenic (hello, Pinterest!), but it also tasted amazing. Creamy cheese, zesty herbs, and just the right amount of crunch. If you love a cheese ball appetizer but crave something a bit more memorable, this recipe is about to become your party MVP.
You don’t have to be a kitchen wizard to pull off this Skellington Cheese Ball. I’ve tested it over a dozen times (even at my neighbor’s annual costume shindig), and it’s always a hit. Whether you’re planning a big Halloween gathering, hosting a movie night, or just want to surprise your family with something festive, this recipe is friendly for all skill levels. Plus, it doubles as a centerpiece—who doesn’t want a Jack Skellington cheese ball staring up at them with that famous smirk?
If you’re searching for a Halloween party recipe that’s easy, crowd-pleasing, and totally Instagram-worthy, stick around. The Skellington Cheese Ball appetizer has your name written all over it!
Why You’ll Love This Recipe
Let’s face it—Halloween is all about fun, surprises, and food that makes you smile (or shiver!). After years of testing appetizers for parties both big and small, I can honestly say this Skellington Cheese Ball is the one that gets devoured first. Here’s why you’ll be hooked:
- Quick & Easy: You’ll have this ready in under 30 minutes, so it’s perfect for last-minute party prep or when you just don’t want to fuss with complicated treats.
- Simple Ingredients: No need to hunt down anything fancy—most items are already chilling in your fridge or pantry.
- Perfect for Parties: This cheese ball is a showstopper for Halloween gatherings, movie nights, or even themed birthday parties. Kids and adults both get a kick out of Jack’s spooky grin!
- Crowd-Pleaser: I’ve never seen leftovers with this one. Creamy, tangy, and packed with flavor—everyone asks for the recipe.
- Unbelievably Delicious: The blend of cheese, herbs, and crunchy add-ins makes every bite crave-worthy. It isn’t just cute—it’s seriously tasty.
What sets this Skellington Cheese Ball apart is how it’s both playful and practical. You get the classic savory flavors you expect (think cream cheese, sharp cheddar, and a hint of garlic), but with a creative twist that makes party guests pause and admire. I always blend the cheese mixture longer for extra-smooth texture, and shaping the ball is easier than it looks. Even if you’ve never sculpted food before, you’ll nail Jack’s iconic face.
Honestly, there’s something magical about watching people gather around the table, snap some pics, and then dig in. The Skellington Cheese Ball isn’t just an appetizer—it’s an experience! Whether you’re a Halloween fanatic or just want a memorable snack for your next get-together, this one delivers smiles, flavor, and a dash of spooky fun.
Ingredients Needed
This recipe keeps things simple but packs a ton of flavor. Most of these are pantry staples, and you can make easy swaps if needed. Let’s break it down:
- For the Cheese Ball:
- 8 oz (225 g) cream cheese, softened (full-fat for best flavor)
- 2 cups (200 g) shredded sharp cheddar cheese
- 1/2 cup (120 ml) sour cream (adds tang and smoothness)
- 2 tbsp chopped green onion (or chives for milder flavor)
- 2 tsp Worcestershire sauce (adds depth—skip for vegetarian)
- 1/2 tsp garlic powder
- 1/2 tsp onion powder
- 1/4 tsp black pepper
- 1/4 tsp salt (or to taste)
- 1/2 cup (60 g) finely chopped pecans or walnuts (optional for crunch)
- For Decorating Jack’s Face:
- 4-5 jumbo black olives (for eyes and nostrils)
- 4 thin strips of roasted red pepper or black olive (for mouth)
- 1 sheet nori (seaweed) or black food coloring gel (for fine details)
- Crackers, pretzels, or veggie sticks (for serving)
Ingredient Tips: I always reach for Philadelphia cream cheese for the creamiest texture, but store brands work fine. If you’re nut-free, just skip the pecans or walnuts entirely. For a sharper flavor, swap half the cheddar for pepper jack or gouda. If you don’t have Worcestershire, a dash of soy sauce or balsamic vinegar can stand in.
Substitutions: Dairy-free cream cheese and vegan cheddar work well for plant-based guests. You can use Greek yogurt instead of sour cream if you want a protein boost (I’ve tried it—still creamy!). For gluten-free, double-check your crackers and Worcestershire sauce.
Seasonal Add-ins: Try chopped roasted pumpkin seeds in fall, or toss in some dried cranberries for a sweet-tart twist. Honestly, I love experimenting—once added a handful of bacon bits, and it disappeared even faster!
The best part? You can adjust these ingredients to suit your crowd, and it’ll still look (and taste) like a Halloween masterpiece.
Equipment Needed
You won’t need a ton of fancy equipment for this Skellington Cheese Ball—just some basics every kitchen should have. Here’s what I use:
- Medium mixing bowl (or stand mixer with paddle attachment for less arm work)
- Rubber spatula (makes scraping and shaping a breeze)
- Plastic wrap (for chilling and shaping the ball)
- Sharp knife or small paring knife (for slicing olives and peppers)
- Cutting board
- Serving plate or small platter (white works best for the spooky look!)
Alternatives: If you don’t have a stand mixer, a sturdy spoon and a little elbow grease are fine. For shaping, clean hands work just as well as a spatula—I sometimes use disposable gloves for less mess.
Maintenance Tips: If you use a mixer, clean the paddle right after mixing (the cheese sticks like glue!). For knives, a damp paper towel helps wipe off the olive oil residue between slices.
Budget-Friendly Advice: Don’t sweat about serving platters—flip a dinner plate upside down for a smooth canvas. For kids’ parties, I’ve even used disposable pie plates (less cleanup!).
You’ll be surprised how easy it is to make this look pro with just the basics.
Preparation Method
Let’s build your Skellington Cheese Ball step by step. It’s easier than it looks, and I’ll toss in some tricks I’ve learned (and a few “don’t do what I did” warnings).
-
Mix the Cheese Base:
In a medium mixing bowl (or stand mixer), combine 8 oz (225 g) softened cream cheese, 2 cups (200 g) shredded cheddar, and 1/2 cup (120 ml) sour cream. Blend until smooth and creamy—about 2 minutes on medium speed. The mixture should look fluffy and hold together when pressed.
Tip: If it’s too stiff, add a spoonful more sour cream. -
Add Flavorings:
Sprinkle in 2 tbsp chopped green onion, 2 tsp Worcestershire sauce, 1/2 tsp garlic powder, 1/2 tsp onion powder, 1/4 tsp black pepper, and 1/4 tsp salt. Mix gently until everything is evenly distributed.
Warning: Don’t overmix—just enough to blend. Overdoing it can make it runny. -
Fold in Crunch (Optional):
Add 1/2 cup (60 g) finely chopped pecans or walnuts if using. Gently fold in with a spatula.
Note: If guests have nut allergies, skip this step. The cheese ball still holds shape and flavor. -
Shape & Chill:
Scoop the mixture onto a sheet of plastic wrap. Gather the sides and twist to form a tight ball (about 4-5 inches/10-12 cm diameter). Chill in the fridge for at least 1 hour—more if you have time. The cheese ball firms up and shapes easier once cold.
Efficiency Tip: I usually make it the night before and decorate the next day. -
Prepare Decorations:
Slice jumbo black olives into thick rounds for eyes and nostrils. Cut thin strips of roasted red pepper or black olive for the mouth. If using nori, cut tiny shapes for stitches and brows. If you’re brave, black food coloring gel works for fine lines—just use a toothpick!
Warning: Dry the olives and peppers with a paper towel to avoid color bleeding. -
Assemble Jack’s Face:
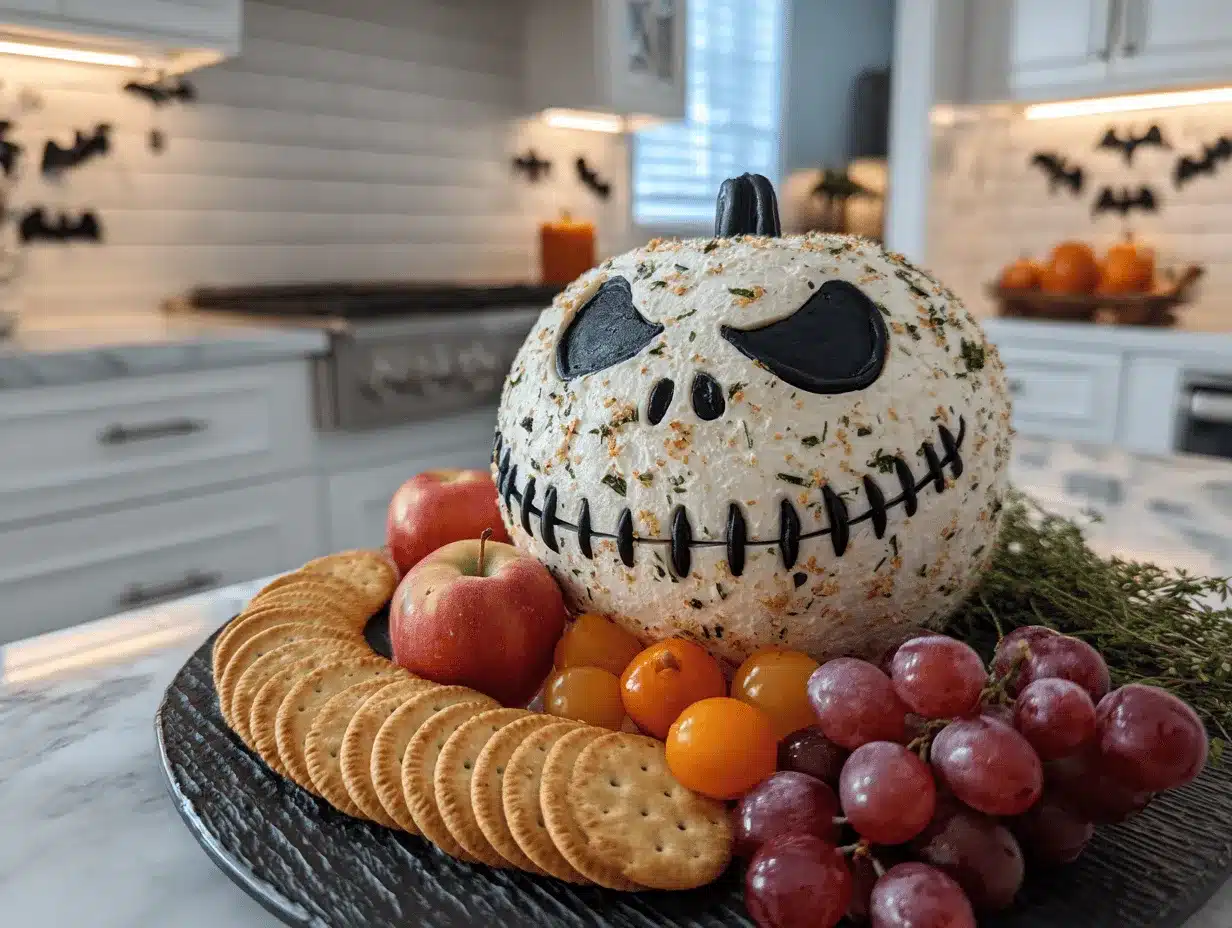
Unwrap the cheese ball and set it on a serving plate. Use the olive rounds for eyes and nose holes. Arrange strips for the mouth, curving them into Jack’s iconic stitched smile. Add nori pieces or coloring for extra details.
Visual Cue: The cheese ball should be smooth and pale—like Jack’s skull! -
Serve:
Surround the cheese ball with crackers, pretzel sticks, or veggie slices. Serve chilled but let it sit at room temp for 20 minutes before eating (easier to scoop!).
Serving Note: Kids love pulling off Jack’s “features” before digging in.
If your cheese ball cracks or goes lopsided, just smooth it over with a spatula. Honestly, the imperfect ones are the most charming! If you’re short on time, skip chilling and shape gently—it will still taste great.
Cooking Tips & Techniques
After making a dozen cheese balls (and a few disasters along the way!), I’ve picked up some tricks you’ll want to know.
- Room Temperature Ingredients: Let the cream cheese and cheddar sit out for 30 minutes. Cold cheese is tough to mix and won’t get that creamy texture.
- Chilling Is Key: Don’t rush the chilling step. The cheese ball firms up and holds shape better, making decorating a breeze.
- Decorating Details: Use a toothpick to “draw” fine stitches or facial lines. I tried a butter knife once—total fail! The toothpick gives you control for those spooky details.
- Flavor Balance: Taste the mixture before shaping. Sometimes, I add a pinch more salt or garlic powder depending on the cheeses I use.
- Prevent Cracks: If the ball cracks when shaping, wet your hands slightly and smooth it over. Don’t stress—Jack’s face is supposed to look a little quirky!
- Multitasking: Make the cheese ball base ahead and decorate just before serving. You can prep the olive eyes and pepper strips in advance—store in a sealed container.
- Consistency: Use block cheese and shred it yourself if you can. Pre-shredded cheese has added starch, which sometimes makes the mixture grainy.
My biggest mistake? Using low-fat cream cheese—it made the ball too soft and sticky. Stick with full-fat for best results. If you’re short on time, chilling the ball in the freezer for 20 minutes works in a pinch.
Honestly, don’t stress about perfection. The charm of homemade Halloween treats is in the little quirks—Jack’s grin is just as fun crooked!
Variations & Adaptations
Halloween parties are all about creativity, so let’s play with the Skellington Cheese Ball! Here are some favorite twists:
- Dietary Variations: Swap regular cream cheese for plant-based or lactose-free cream cheese. Use vegan cheddar and skip Worcestershire for a dairy-free, vegetarian version.
- Seasonal Spin: Add 1/4 cup (25 g) diced roasted red peppers or jalapeños for a little kick. In the winter, toss in some chopped dried cranberries for sweet-tart flavor.
- Spicy Jack: Mix in a teaspoon of chipotle powder or cayenne for a fiery cheese ball. I tried this for an adults-only party—people loved the heat!
- Cooking Methods: Shape the cheese ball into mini “skulls” for individual servings, or press the mixture into a silicone mold for a perfect Jack face.
- Flavor Preferences: Use smoked gouda or pepper jack for a bold twist. Add chopped bacon, scallions, or sun-dried tomatoes for extra zing.
- Allergen Substitutions: Omit nuts entirely or use sunflower seeds for crunch. For gluten-free, serve with rice crackers or veggie sticks.
My personal favorite? Adding a handful of crumbled bacon and using chipotle cheddar for a smoky, spicy Jack. It disappeared before I could grab seconds!
Serving & Storage Suggestions
Presentation is everything with the Skellington Cheese Ball. Here’s how to serve and store it for maximum Halloween impact:
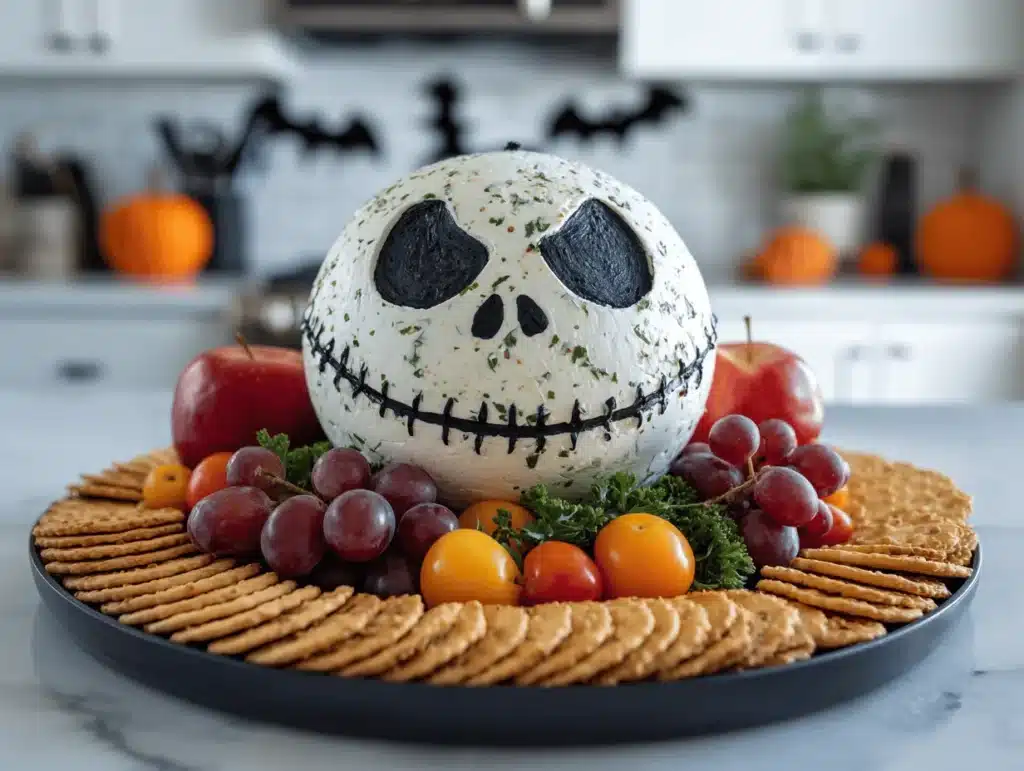
- Serving: Place Jack front-and-center on a white platter, surrounded by colorful crackers, pretzels, and veggie sticks. Serve chilled but let it sit out for 20 minutes so it’s easy to scoop.
- Temperature: Best served cool but not fridge-cold. I usually pull it out just before guests arrive.
- Pairings: Goes great with apple slices, grapes, or a tangy mustard dip. For drinks, I love pairing with sparkling cider or festive punch.
- Storage: Wrap leftovers tightly in plastic wrap and refrigerate for up to 3 days. The flavors actually deepen overnight.
- Freezing: You can freeze the undecorated cheese ball for up to 1 month. Thaw overnight in the fridge, then decorate before serving.
- Reheating: Not needed—this one’s a cold dish. But if it gets too firm, let it rest at room temp for 15-20 minutes.
I’ve noticed the flavors get bolder after a day or two, so sometimes I make it ahead for a flavor boost. If you have leftovers, try spreading it on bagels or sandwiches—seriously tasty!
Nutritional Information & Benefits
Here’s a quick look at what you’re getting per serving (about 2 tablespoons/30 g):
- Calories: ~110
- Protein: 4 g
- Fat: 9 g
- Carbohydrates: 2 g
- Sugar: 1 g
- Sodium: 170 mg
Health Benefits: The Skellington Cheese Ball is rich in calcium and protein thanks to the cheese and nuts. If you use Greek yogurt or plant-based ingredients, you’ll get a nice boost of probiotics and healthy fats.
Dietary Considerations: This recipe is naturally gluten-free if served with veggie sticks or gluten-free crackers. Easily adaptable for vegetarian or nut-free diets. Contains dairy and nuts—check with guests for allergies.
From a wellness perspective, I love that you can tweak this to suit different diets. It’s all about balance and having fun—Halloween treats don’t have to be loaded with sugar!
Conclusion
If you’re searching for a Halloween party centerpiece that’s easy, playful, and totally delicious, the Skellington Cheese Ball appetizer is your answer. It’s the kind of recipe that makes people smile, snap photos, and come back for seconds. You can customize the flavors, decorations, and serving style to fit any crowd, and it’s friendly for beginner cooks.
Personally, I love how it brings a little spooky magic to the table—Jack’s grin never fails to get a laugh! Whether you’re hosting a big bash or just hanging out with family, this cheese ball makes Halloween memorable (and tasty).
Ready to try the Skellington Cheese Ball? Jump in, make it your own, and share your results! Leave a comment below with your favorite variation, or tag me on social if you put your own twist on Jack’s famous face. Happy haunting and happy snacking!
FAQs
How far ahead can I make the Skellington Cheese Ball?
You can make the cheese ball base up to 2 days in advance. Just decorate it right before serving for best results.
Can I freeze the cheese ball?
Yes! Freeze the undecorated cheese ball for up to 1 month. Thaw overnight in the fridge and add decorations before serving.
What crackers or sides go best with this appetizer?
I love serving with buttery crackers, pretzel sticks, veggie slices, or even apple wedges for a sweet crunch.
How do I make this recipe nut-free?
Simply skip the nuts or swap in sunflower seeds for a similar texture. It’s still delicious and holds together well.
Can I use low-fat or dairy-free cheese?
You can! Just expect a slightly softer texture with low-fat cheese. Plant-based cream cheese and cheddar work great for dairy-free guests.
Pin This Recipe!
Skellington Cheese Ball Appetizer: Easy Halloween Party Recipe
- Total Time: 1 hour 15 minutes
- Yield: 10 servings 1x
Description
A creamy, savory cheese ball shaped like Jack Skellington, perfect for Halloween parties. This show-stopping appetizer is easy to make, crowd-pleasing, and doubles as a festive centerpiece.
Ingredients
- 8 oz cream cheese, softened (full-fat for best flavor)
- 2 cups shredded sharp cheddar cheese
- 1/2 cup sour cream
- 2 tbsp chopped green onion (or chives)
- 2 tsp Worcestershire sauce (skip for vegetarian)
- 1/2 tsp garlic powder
- 1/2 tsp onion powder
- 1/4 tsp black pepper
- 1/4 tsp salt (or to taste)
- 1/2 cup finely chopped pecans or walnuts (optional)
- 4–5 jumbo black olives (for eyes and nostrils)
- 4 thin strips roasted red pepper or black olive (for mouth)
- 1 sheet nori (seaweed) or black food coloring gel (for fine details)
- Crackers, pretzels, or veggie sticks (for serving)
Instructions
- In a medium mixing bowl or stand mixer, combine softened cream cheese, shredded cheddar, and sour cream. Blend until smooth and creamy, about 2 minutes on medium speed.
- Add chopped green onion, Worcestershire sauce, garlic powder, onion powder, black pepper, and salt. Mix gently until evenly distributed.
- Fold in finely chopped pecans or walnuts if using.
- Scoop the mixture onto a sheet of plastic wrap. Gather the sides and twist to form a tight ball (about 4-5 inches diameter). Chill in the fridge for at least 1 hour.
- Slice jumbo black olives into thick rounds for eyes and nostrils. Cut thin strips of roasted red pepper or black olive for the mouth. Cut nori for stitches and brows, or use black food coloring gel for fine details.
- Unwrap the cheese ball and set it on a serving plate. Use olive rounds for eyes and nose holes. Arrange strips for the mouth, curving them into Jack’s stitched smile. Add nori pieces or coloring for extra details.
- Surround the cheese ball with crackers, pretzel sticks, or veggie slices. Serve chilled but let it sit at room temperature for 20 minutes before eating.
Notes
For best texture, use full-fat cream cheese and shred your own cheddar. Make the cheese ball base ahead and decorate just before serving. Nut-free and vegetarian adaptations are easy. Chilling is key for shaping and decorating. Imperfections add charm to Jack’s face!
- Prep Time: 15 minutes
- Cook Time: 0 minutes
- Category: Appetizer
- Cuisine: American
Nutrition
- Serving Size: 2 tablespoons (about 30 g)
- Calories: 110
- Sugar: 1
- Sodium: 170
- Fat: 9
- Carbohydrates: 2
- Protein: 4
Keywords: Halloween, cheese ball, appetizer, party food, Jack Skellington, spooky, easy, crowd-pleaser, vegetarian option, nut-free option