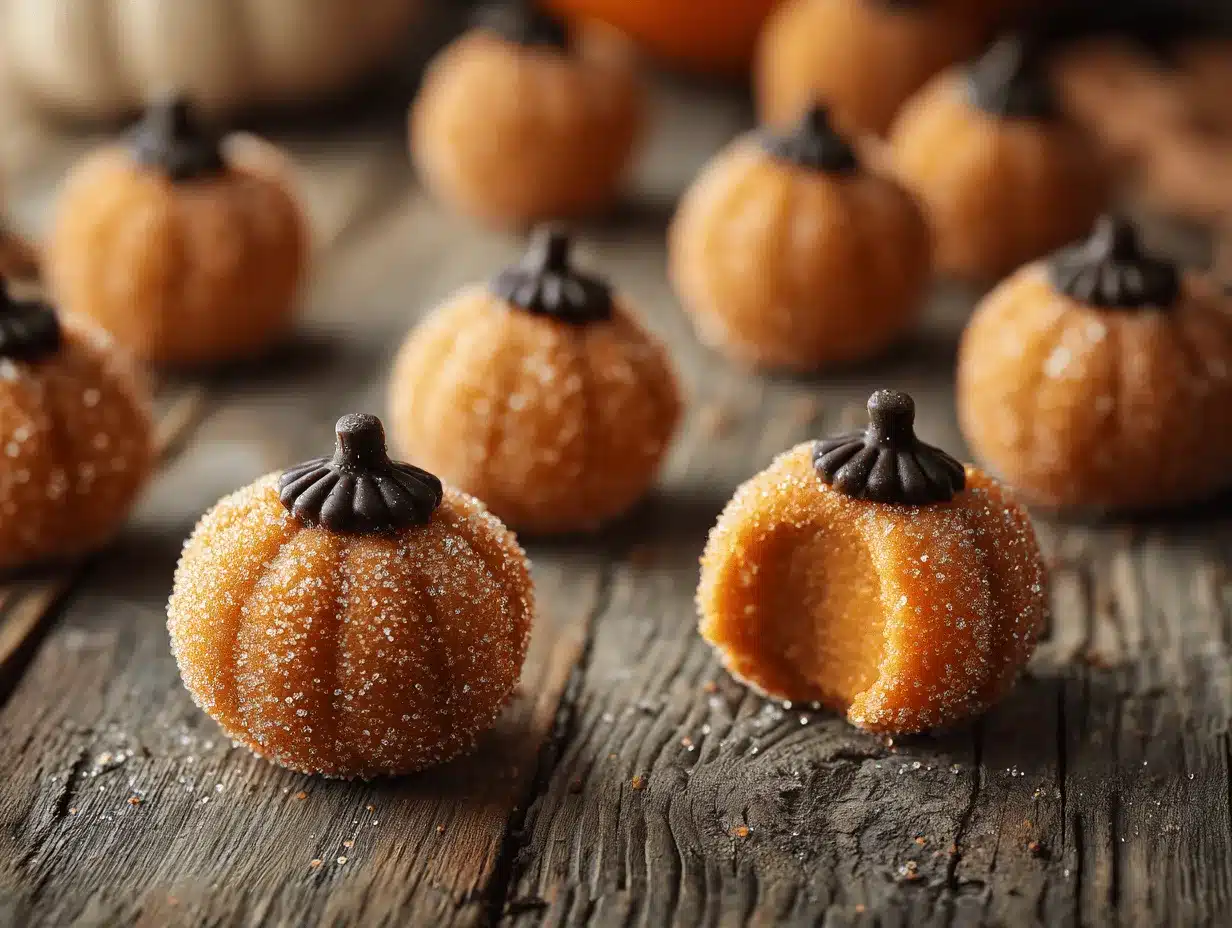
The first time I bit into a pumpkin cheesecake truffle was on a blustery October afternoon, and honestly, it was love at first bite. The smooth creaminess, the spiced pumpkin flavor, and that irresistible, chocolatey shell—each little ball was pure fall magic. If you’re craving autumn in a bite-sized treat, these pumpkin cheesecake truffles are about to become your new favorite dessert. I’ve made these dozens of times for parties, family movie nights, or just those moments when you need a pick-me-up that tastes like the coziest sweater you own.
What makes this pumpkin cheesecake truffles recipe so special? For starters, you don’t need to fuss with a springform pan, water bath, or hours in the oven. These are quick, no-bake, and totally foolproof—plus, they look adorable on any dessert tray! As someone who’s spent years experimenting with fall recipes, I can honestly say this one is a crowd-pleaser every time. You get all the classic pumpkin spice flavor but with a creamy, tangy cheesecake twist. And you get to eat them with your fingers—who doesn’t love that?
Whether you’re hosting a party, packing lunchbox treats, or just want to impress your friends with something that screams “fall vibes,” pumpkin cheesecake truffles are a must-try. They’re perfect for busy families (kids go wild for them), high-protein snacking, or anyone who just can’t get enough pumpkin. Trust me, after making these for my kids, my book club, and even my skeptical neighbor, I know they’re always a hit. Grab your mixing bowl and let’s get started—the magic is in the details!
Why You’ll Love This Recipe
If you’re searching for a pumpkin dessert that’s easy, delicious, and downright adorable, this pumpkin cheesecake truffles recipe is it. After testing dozens of truffle variations and tweaking the spice blend, I’m convinced this version is the best balance of flavor, texture, and simplicity. Here’s why you’ll want to make them again and again:
- Quick & Easy: Ready in about 30 minutes—no oven or fancy techniques required.
- Simple Ingredients: You probably have most of these in your pantry right now.
- Perfect for Parties: Cute, bite-sized treats that look stunning on any fall dessert table.
- Crowd-Pleaser: Kids, adults, even pumpkin skeptics—these never last long.
- Unbelievably Delicious: Creamy, spiced, and coated in chocolate—like a pumpkin cheesecake in truffle form.
What sets these pumpkin cheesecake truffles apart? The secret is in the balance: just enough pumpkin for flavor, real cream cheese for tang, and a hint of cinnamon and nutmeg for warmth. I’ve tried blending cottage cheese and even swapping in almond flour for a gluten-free twist, but this classic combo delivers every time. These aren’t just another “pumpkin ball”—they’re melt-in-your-mouth, crave-worthy little bites.
Let’s face it, autumn is busy. I love that I can whip up a batch of truffles in under an hour, stash them in the fridge, and have something special for guests—or just myself! The best part? They taste like you went all out, but the process is so simple. It’s comfort food in the cutest package, and honestly, there’s nothing more satisfying than seeing someone close their eyes after the first bite. These truffles are proof that fall flavors can be easy, fun, and magical.
Ingredients Needed
This pumpkin cheesecake truffles recipe keeps things simple while packing in tons of flavor. Every ingredient plays its part in creating that creamy, spiced filling and chocolatey shell. Trust me, nothing here is fancy or hard to find—you’ll be surprised how much fall goodness you can squeeze into a handful of pantry staples.
- Cream Cheese (8 oz/225g, softened) – Full-fat for the best texture and flavor. I love Philadelphia, but any trusted brand works.
- Pure Pumpkin Puree (1/2 cup/120g) – Not pumpkin pie filling! Libby’s is my go-to for smooth texture.
- Powdered Sugar (1 cup/120g) – For sweetness and smoothness. Sift if lumpy.
- Graham Cracker Crumbs (3/4 cup/75g) – Adds structure and a little crunch. Use gluten-free if needed.
- Vanilla Extract (1 tsp/5ml) – Real vanilla brings everything together.
- Pumpkin Pie Spice (1½ tsp/4g) – Or use 1 tsp cinnamon + ¼ tsp nutmeg + ¼ tsp ginger.
- Salt (⅛ tsp/0.5g) – Just a pinch to make everything pop.
- White Chocolate Chips (1¼ cups/210g) – For coating. You can swap for milk or dark chocolate if you prefer.
- Coconut Oil (2 tsp/10ml, optional) – Helps the chocolate shell stay smooth and glossy.
If you’re out of graham crackers, vanilla wafers or digestive biscuits work well. Want to make it dairy-free? Use vegan cream cheese and chocolate chips. And if you’re cutting back on sugar, try monk fruit powdered sweetener—just keep in mind it can affect the texture a little.
For extra crunch, you can roll the truffles in chopped pecans, walnuts, or even toasted coconut before dipping in chocolate. I’ve done all these swaps and honestly, the recipe is super forgiving. In summer, swap the pumpkin for mashed banana and skip the spice. For a holiday twist, add a dash of orange zest or a sprinkle of sea salt on top. The possibilities are endless!
Pro tip: Always taste your pumpkin puree before using—it should be sweet and mellow, not watery or bitter. This makes a huge difference in the final flavor. And if you want a firmer filling, add extra graham crumbs until the mixture holds together easily. You really can’t mess this up!
Equipment Needed
- Mixing Bowls: At least two—one for the filling, one for melting chocolate. Stainless steel is easiest for cleanup.
- Hand Mixer or Stand Mixer: For smooth, lump-free filling. A sturdy wooden spoon works if you’re old school (and have strong arms!).
- Cookie Scoop or Tablespoon: For evenly sized truffles. I use a 1-inch scoop for perfect little balls.
- Baking Sheet: For setting the truffles before dipping.
- Parchment Paper or Nonstick Mat: Keeps truffles from sticking.
- Microwave-Safe Bowl or Double Boiler: For melting chocolate chips. I’ve ruined a few batches by overheating, so use low power!
- Forks or Dipping Tools: For coating truffles in chocolate. Two forks work just fine.
- Refrigerator: You’ll need space to chill the truffles for best results.
If you don’t have a cookie scoop, rolling by hand is easy—just keep your hands slightly damp to avoid sticking. Honestly, most of the time I just grab whatever bowl is clean and a sturdy spatula. For melting chocolate, a glass Pyrex bowl is my favorite because it doesn’t get too hot. If chocolate starts to seize, a few drops of coconut oil smooths it out.
On a budget? Skip the fancy dipping tools. Two forks and a plate lined with wax paper do the job. Just don’t forget to wipe melted chocolate off your hands before grabbing your phone for photos (learned the hard way!).
Preparation Method
-
Make the Filling:
- Add 8 oz (225g) cream cheese to a large mixing bowl. Beat with a hand mixer on medium until smooth (about 1 minute).
- Add 1/2 cup (120g) pumpkin puree, 1 cup (120g) powdered sugar, 3/4 cup (75g) graham cracker crumbs, 1 tsp (5ml) vanilla extract, 1½ tsp (4g) pumpkin pie spice, and ⅛ tsp (0.5g) salt.
- Mix until totally combined and creamy, about 2 minutes. The mixture should be thick but scoopable—if it’s too soft, add 2-3 tbsp extra graham crumbs.
- Taste and adjust spice or sweetness as needed. The filling should smell warm and inviting, with no lumps.
-
Shape the Truffles:
- Line a baking sheet with parchment paper or a nonstick mat.
- Use a cookie scoop or tablespoon to portion out the filling. Roll into balls about 1 inch (2.5cm) in diameter—makes about 18-20 truffles.
- Place balls on the lined sheet. Chill in the refrigerator for 30 minutes, or pop in the freezer for 10 minutes if you’re in a hurry.
- If the filling is sticky, dampen your hands slightly or dust with powdered sugar.
-
Melt the Chocolate:
- Place 1¼ cups (210g) white chocolate chips and 2 tsp (10ml) coconut oil in a microwave-safe bowl.
- Microwave in 20-second intervals, stirring after each, until smooth and melted (usually 60-90 seconds total).
- Alternatively, melt in a double boiler over low heat, stirring often.
- If chocolate seizes or gets too thick, add a little extra coconut oil.
-
Dip the Truffles:
- Using two forks, dip each chilled truffle into the melted chocolate, turning to coat completely.
- Lift out, allowing excess chocolate to drip off, then place back on the lined baking sheet.
- If you want extra flair, sprinkle with a pinch of pumpkin pie spice, chopped pecans, or orange zest before the chocolate sets.
- Repeat until all truffles are coated.
-
Set and Serve:
- Let truffles sit at room temperature until the chocolate hardens (about 20 minutes), or refrigerate for faster setting.
- Once set, transfer to an airtight container and keep chilled until ready to serve.
Troubleshooting: If the filling feels too soft, add more graham crumbs or chill longer before dipping. If chocolate cracks, let truffles warm up a minute before dipping. If your kitchen is warm, work in small batches and keep extras chilled. I’ve had truffles go mushy when I rushed—patience pays off!
Efficiency tip: While the truffles chill, melt the chocolate and prep your toppings. Multitasking here really helps. And don’t stress about perfection—these truffles are all about fun!
Cooking Tips & Techniques
Making pumpkin cheesecake truffles isn’t hard, but there are a few tricks I’ve learned (sometimes the hard way!). Here’s what’ll help your batch turn out perfect every time:
- Room-Temperature Cream Cheese: Cold cream cheese leads to lumpy filling. Let it sit out for 30 minutes—or microwave for 10 seconds at a time until soft.
- Don’t Overmix: Mix just until smooth. Too much mixing can make the filling runny, especially if your pumpkin puree is watery.
- Chill, Chill, Chill: If you skip chilling, truffles will be sticky and hard to dip. I once tried to rush—ended up with a gooey mess and chocolate everywhere.
- Low Heat for Chocolate: Chocolate burns fast. Melt gently, stir often, and add coconut oil if it’s too thick.
- Work in Batches: Only dip a few truffles at a time, keeping the rest chilled. This keeps the shapes tidy and chocolate smooth.
- Customize Coating: White chocolate looks festive, but milk or dark chocolate adds a rich flavor. If you want color, drizzle with orange-tinted candy melts.
- Don’t Worry About Perfection: Homemade truffles are meant to look rustic and cute. I used to stress about cracks or uneven coatings—now I just embrace the charm!
Timing is key—don’t let the chocolate sit too long or it’ll stiffen up. If you’re multitasking, prep toppings while the truffles chill. And if you ever have leftover filling, roll it into mini balls and freeze for quick treats. Consistency is everything with truffles, so if the filling feels too sticky, add more crumbs; if it’s crumbly, a splash of milk helps.
My biggest lesson? Don’t skip the chill time. I’ve ruined a batch or two by dipping warm truffles, and trust me, chocolate chaos isn’t fun to clean up!
Variations & Adaptations
One of the best things about pumpkin cheesecake truffles is how easily you can tweak them to suit your taste, dietary needs, or whatever’s in your pantry. Here are some favorite ways to switch things up:
- Gluten-Free: Replace graham crackers with gluten-free crumbs or almond flour. I’ve made this swap for friends with celiac and it works perfectly.
- Dairy-Free: Use vegan cream cheese and dairy-free chocolate chips. The texture is slightly softer, but the flavor is spot-on.
- Nutty Crunch: Roll truffles in finely chopped pecans or walnuts before dipping in chocolate for extra texture.
- Spice Swap: Try chai spice or gingerbread spice mix for a fun twist. I love adding a pinch of cardamom for an unexpected kick.
- Chocolate Choice: Use dark chocolate or even orange-flavored chocolate for the shell. It’s a great way to play with flavors.
For cooking method adaptations, you can skip the chocolate dip and roll finished truffles in cocoa powder or cinnamon sugar for a lighter, less sweet finish. If you want to bake the filling for a firmer texture, scoop balls onto a sheet and bake at 350°F (175°C) for 10 minutes—just let them cool before dipping.
My personal favorite? Swapping half the pumpkin for mashed sweet potato and adding a dash of maple syrup. It’s sweet, earthy, and totally unique. The recipe is so forgiving—just taste as you go and make it your own!
Serving & Storage Suggestions
These pumpkin cheesecake truffles are best served chilled or at cool room temperature. I love to pile them up on a pretty plate, sprinkle with extra pumpkin pie spice or chopped nuts, and watch them disappear at fall parties. For a Pinterest-worthy look, arrange on a rustic wooden board with mini pumpkins and cinnamon sticks around.
Pair with hot coffee, chai tea, or spiced cider for the ultimate cozy treat. They also work beautifully alongside apple pie bars, salted caramel brownies, or even as part of a fall-themed dessert buffet.
To store, keep truffles in an airtight container in the refrigerator for up to 5 days. They freeze well too—just layer with wax paper and freeze for up to 2 months. Thaw in the fridge overnight before serving. If you want to reheat (not usually needed), pop in the microwave for 5 seconds, but be careful not to melt the chocolate shell.
One fun thing I’ve noticed—after a day or two, the spices seem to intensify and the texture gets even creamier. So don’t be afraid to make them ahead!
Nutritional Information & Benefits
Each pumpkin cheesecake truffle is about 90-110 calories, depending on chocolate coating and size. They’re higher in protein and vitamin A thanks to real pumpkin and cream cheese, and you can make them lower-carb by swapping powdered sugar for a keto-friendly sweetener.
Pumpkin is loaded with fiber and antioxidants, while cream cheese adds calcium and healthy fats. If you use gluten-free crumbs, they’re safe for sensitive eaters, and vegan swaps make them dairy-free. Just note: these contain dairy, gluten (unless adapted), and nuts if you add them as a topping.
I love that these are bite-sized—perfect for portion control and mindful indulgence. For me, they’re a great way to enjoy fall flavors without overdoing it. As a parent, I appreciate sneaking a little vegetable into a dessert my kids actually beg for!
Conclusion
If you’re looking for an easy, show-stopping fall dessert, pumpkin cheesecake truffles are absolutely worth making. They’re creamy, spiced, and wrapped in chocolate—what’s not to love? Whether you follow the classic recipe or tweak with your favorite flavors, you’ll end up with cute, crowd-pleasing treats that taste like autumn.
I always encourage readers to play with the recipe—add more spice, swap the chocolate, or try new toppings. Cooking should be fun and a little messy! Personally, I love these truffles because they remind me of cozy evenings and laughter around the table. They’re the kind of dessert that brings people together.
If you make these, drop a comment below and let me know how you adapted them. Share with friends on Pinterest, tag your photos, and spread the pumpkin cheesecake truffle magic. Happy baking—wishing you all the sweet, spicy joy of fall!
FAQs
Can I make pumpkin cheesecake truffles ahead of time?
Absolutely! They keep well in the fridge for up to 5 days and freeze for up to 2 months. I often make a double batch before parties.
Can I use homemade pumpkin puree?
Yes, just make sure it’s well-drained and thick, so the filling isn’t watery. Taste for sweetness—some pumpkins are more bland.
What’s the best chocolate for coating?
White chocolate pairs perfectly with pumpkin, but milk or dark chocolate works too. Use good-quality chips for a smooth shell.
How do I make these gluten-free?
Swap graham cracker crumbs for gluten-free cookie crumbs or almond flour. The texture will be slightly different but still delicious.
Can I add nuts or other mix-ins?
Definitely! Chopped pecans, walnuts, or even mini chocolate chips can be mixed in or used as a topping for extra crunch and flavor.
Pin This Recipe!
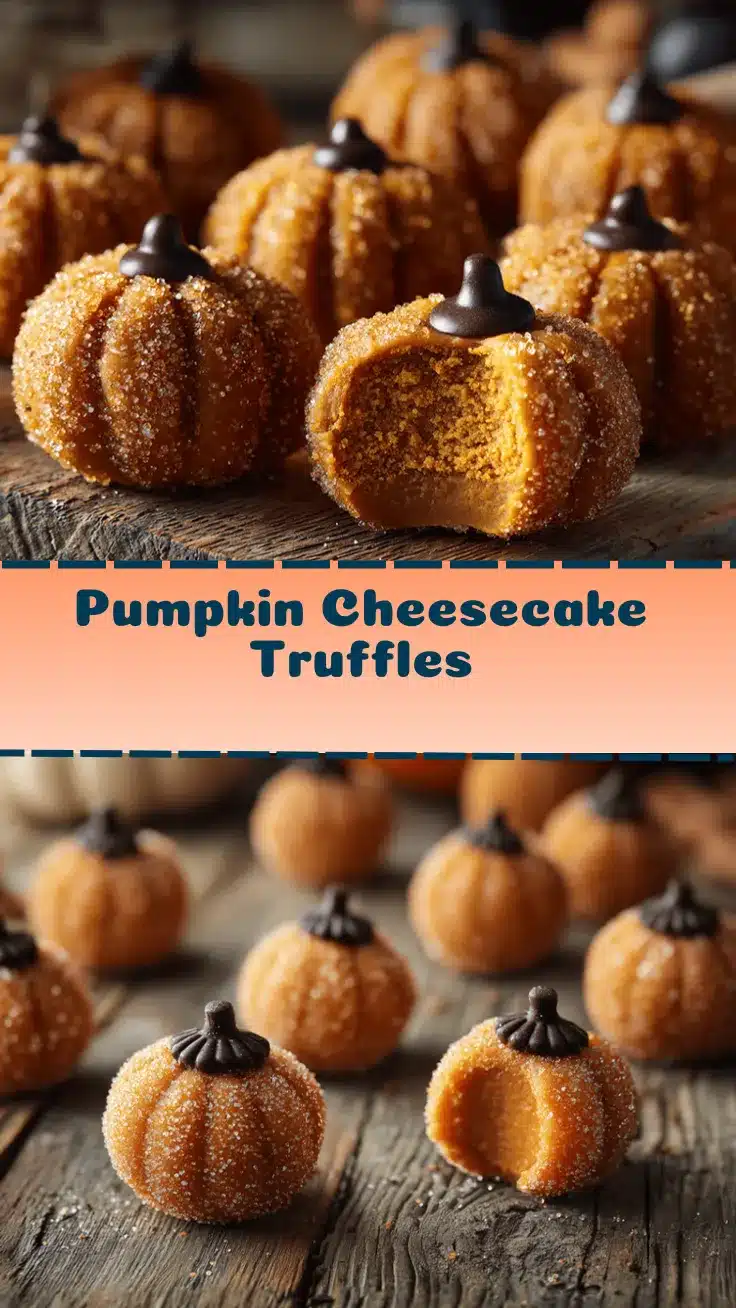

Pumpkin Cheesecake Truffles
- Total Time: 30 minutes
- Yield: 18-20 truffles 1x
Description
Pumpkin cheesecake truffles are creamy, spiced, bite-sized treats coated in chocolate—perfect for fall parties or cozy nights in. This easy, no-bake recipe delivers all the flavors of pumpkin cheesecake in a fun, finger-friendly dessert.
Ingredients
- 8 oz cream cheese, softened
- 1/2 cup pure pumpkin puree
- 1 cup powdered sugar
- 3/4 cup graham cracker crumbs
- 1 tsp vanilla extract
- 1 1/2 tsp pumpkin pie spice (or 1 tsp cinnamon + 1/4 tsp nutmeg + 1/4 tsp ginger)
- 1/8 tsp salt
- 1 1/4 cups white chocolate chips (for coating)
- 2 tsp coconut oil (optional, for chocolate coating)
Instructions
- Add softened cream cheese to a large mixing bowl. Beat with a hand mixer on medium until smooth (about 1 minute).
- Add pumpkin puree, powdered sugar, graham cracker crumbs, vanilla extract, pumpkin pie spice, and salt.
- Mix until totally combined and creamy, about 2 minutes. If mixture is too soft, add 2-3 tbsp extra graham crumbs.
- Taste and adjust spice or sweetness as needed.
- Line a baking sheet with parchment paper or a nonstick mat.
- Use a cookie scoop or tablespoon to portion out the filling. Roll into balls about 1 inch in diameter (makes about 18-20 truffles).
- Place balls on the lined sheet. Chill in the refrigerator for 30 minutes, or freeze for 10 minutes if in a hurry.
- Place white chocolate chips and coconut oil in a microwave-safe bowl. Microwave in 20-second intervals, stirring after each, until smooth and melted (60-90 seconds total). Alternatively, melt in a double boiler over low heat.
- Using two forks, dip each chilled truffle into the melted chocolate, turning to coat completely. Lift out, allowing excess chocolate to drip off, then place back on the lined baking sheet.
- Sprinkle with pumpkin pie spice, chopped pecans, or orange zest if desired before the chocolate sets.
- Let truffles sit at room temperature until the chocolate hardens (about 20 minutes), or refrigerate for faster setting.
- Once set, transfer to an airtight container and keep chilled until ready to serve.
Notes
For gluten-free truffles, use gluten-free graham crumbs or almond flour. Dairy-free cream cheese and chocolate chips work for vegan adaptation. Chill truffles well before dipping for best results. Customize with different spices, nuts, or chocolate coatings. Truffles can be made ahead and freeze well for up to 2 months.
- Prep Time: 15 minutes
- Cook Time: 15 minutes
- Category: Dessert
- Cuisine: American
Nutrition
- Serving Size: 1 truffle (about 1 inch diameter)
- Calories: 100
- Sugar: 9
- Sodium: 60
- Fat: 6
- Saturated Fat: 4
- Carbohydrates: 11
- Fiber: 0.5
- Protein: 2
Keywords: pumpkin cheesecake truffles, fall dessert, no-bake, party treats, pumpkin spice, easy truffles, cream cheese, chocolate coated, autumn recipes